 (+91) 7249196273

Early Cracks in Plasters aren’t just unpleasant but they are indicative to something wrong in material selection or the procedure used for application. The most Common defects observed in Plasters are Plastic shrinkage cracks & drying shrinkage cracks. Let us now understand the reasons of occurrence of these cracks in Plaster and steps to be taken to minimise them.
Plastic Shrinkage Cracks and How to Avoid Them
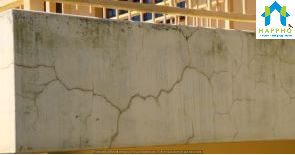
Plastic Shrinkage crack (Fig 1 & 2) results when an excessive amount of water is lost from the plaster in the first few hours after its application. When the cracks are noticed while the plaster is still plastic (yet to harden), they are often floated (finished to make it look like smooth) and closed at site. But its not a good practise as these cracks reappear some time in near future.
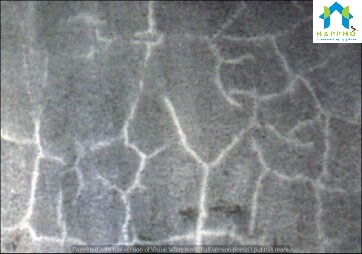
Plastic Shrinkage Cracks
You can avoid plastic shrinkage cracks by using Gypsum Plaster for Internal Plastering works. Read more On : Gypsum Plaster Advantage and Disadvantage?
Guidelines to Avoid Plastic Shrinkage Cracks
- Protect the plaster from sun & wind to avoid drying too quickly, initiate plastering timing to avoid direct sunlight and strong wind on plastering surface
- Saturate the masonry wall adequately with water before plastering. This will avoid the brick work from absorbing the water in plaster
- Start curing as early as possible if the weather is hot, windy and dry (less humid)
- Do not use sand which lacks fine material (less than 15% by mass passing 0.150mm sieve or use Sand of Fineness modulus beteween 2.4 to 2.6)
- If sand lacks fine material then add some lime into cement plaster
Drying Shrinkage Cracks and How to Avoid Them
Drying shrinkage result (fig 3 & 4) due to moisture loss after the plaster has hardened. Plaster is bound to shrink and crack. Usually, Plaster applied in layers that are too thick (i.e., >20mm) will tend to crack in this way. These cracks are normally stable and can be filled with crack repair mortar and painted over.
It is possible to reduce drying shrinkage and hence the resultant cracks.
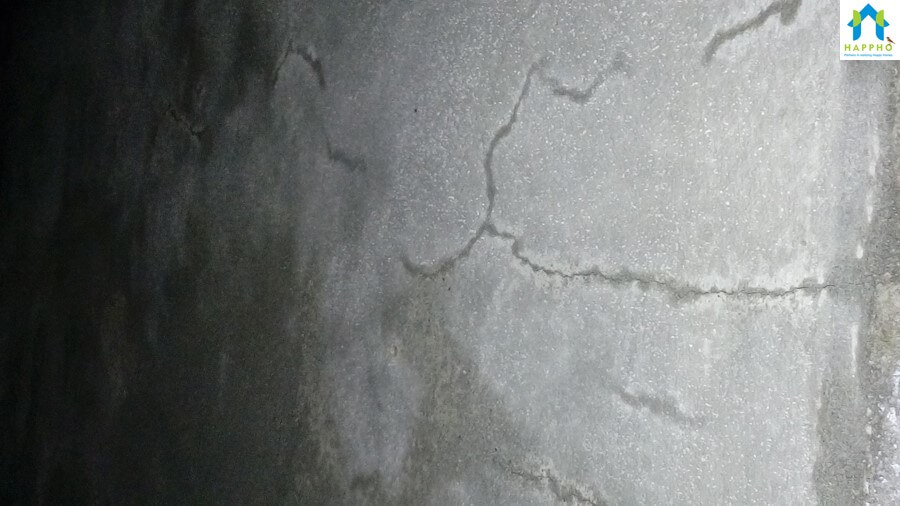
Drying Shrinkage Cracks
Guidelines to avoid Drying Shrinkage Cracks
- Do not use very fine sand requiring more water (Don”t use sand with Fineness modulus < 2.2). We recommend usage of plaster Sand for Plastering Purposes.
- Do not use rich plaster mix (with High Cement Content). Use cement motar mix of 1:4 or below depending on the quality of Sand
- Avoid OPC preferably used flyash blended cement (PPC). PPC has less heat of hydration so will results in lesser cracks as compared to OPC
- Use water reducing admixture in plaster mix
- Avoid very thick plaster layers (i.e., thickness more than 15mm). If you need more thickness, then build plaster in layers of 12-15 mm with a gap of 3 days
- Do the curing immediately after the setting time of plaster mortar for a period of minimum of 07 days
How To repair Shrinkage Cracks
Shrinkage cracks are small (up to 2mm) taking random directions appearing in plaster walls and ceilings, usually these are nothing to worry about as the main structure is still sound , these are basically classified as non-structural cracks.If paint are applied on it, without attending the cracks,the cracks shall be visible on painted surface ,a eyesore for all.
Shrinkage cracks in plaster should first be widened so that filler can be pushed right in and has something to key on to.The corner of a scraper or filling/putty knife is ideal for removing any loose plaster and for opening up and deepening the crack. Dry paint brush can be used along the line of the crack to remove any loose dust and dirt.
Mix a quantity of filler as per the manufacturer”s instructions and before applying it, dampen (but don”t soak) the inside of the crack using a small paint brush dipped in clean water.
Dampen the inside of the crack using a small paint brush dipped in clean water,apply crack filler paste ,a polymer modified ready to use paste available with Sunanda,Dr.Fxit,Sika etc. into cracks in plaster
Use a filling/putty knife to apply the filler along the line of the crack and press the filler into it – leave the filler proud of the surrounding surface.
Dip a clean filling/putty knife in clean water and run it along the line of the crack to level the filler to the surface around it.
The treated surface can now be taken up for Painting.