Natural stone such as granite, marble and limestone provide numerous design possibilities for the enhancement of front facades of spaces such as hotel lobbies, shopping mall, stores etc. natural stone is not only used for sprucing up the front façade but also used as flooring, pavement and interior cladding material.
There are a number of different ways for the installation of natural stone few of them are listed below:
Wet Installation Method of Natural Stone Cladding
Wet installation method which is also known as direct adhered method, is the most common method used for the installation of natural stone cladding. The reason behind its prevalence is its ease with which it can be used.
Advantages of Wet Installation Method
- It is cheaper
- Requires no onsite drilling
- Eliminates the chances of cracks on wall due to drilling.
- Bonds perfectly from edge to edge leaving no space in between which makes it look more even.
Disadvantages of Wet Installation Method
- Due to the edge to edge bonding there is no room for later expansion which could result in buckling of natural stone. Expansion and contraction joints are always recommended.
- If the bond between the wall and the adhesive/ mortar is not intact then there are chances that the stone can fall off.
- The stone fixed with mortar may change in colour due to absorption of water from back mortar layer.
- It is a time consuming procedure.
Here is the step-by-step procedure for the wet installation method of natural stone cladding:
Step-by-Step Procedure for Wet Installation Method
Step-1: Calculate the Material Requirement
Before starting with the installation procedure you first need to calculate the area where you want to clad. You can calculate by simply measuring its length and breadth and then multiplying it. This would help you get an estimated amount of material for the cladding.
Step-2: Surface Preparation
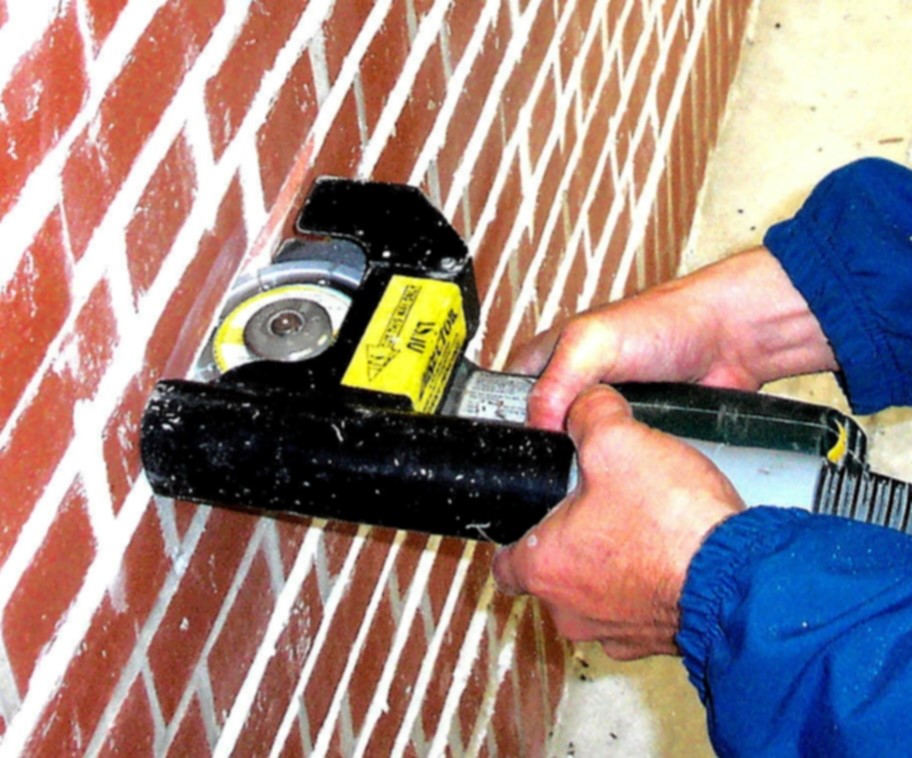
Cutting grooves with the help of angle grinder
This is the most crucial part the whole procedure as it would ensure the bonding that the adhesive/ mortar will have the wall because if the bond between the adhesive/ mortar and wall is not intact than the cladding can plunge off the wall. So the procedure for surface preparation is as follows-
- Plastered wall to be rough finished for mechanical ponding,wet cladding can be initiated directly on wall.
- If your wall is painted remove the layerusing grinders than cut grooves into wall using an angle grinder, horizontally as well as vertically to create keys, for mechanical bonding.
- Hacking of old plaster using a chisel or a hammer to make the surface.
Step-3: Mixing the Mortar
Marble and natural stone are installed with thin-set mortar mix (2 parts sand to 1 part PPC Cement) mixed only with clean cold water. Make sure that the colour of your mortar doesn’t affect the natural stone. Adhesives are also available in market for stone cladding.
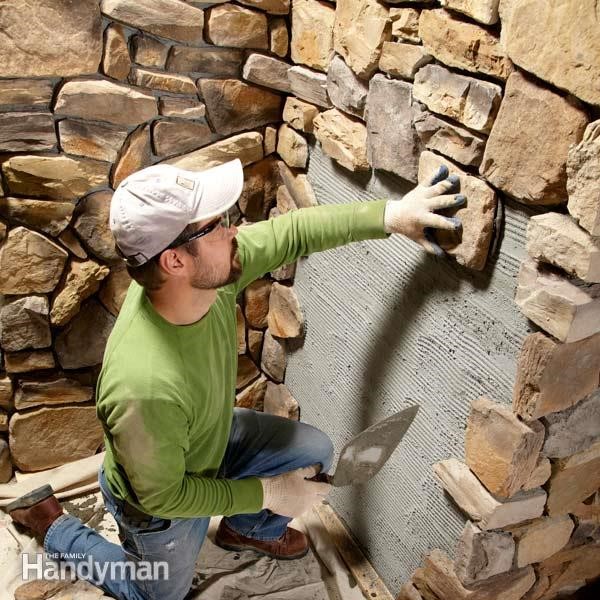
Step-4: Installation Procedure
- Ensure that the surface is not friable and that all laitance, dust is removed. Do not wet the surface before cladding commences.
- Mortar mix must be applied to the surface to a minimum bed thickness of 10mm.
- Spread only enough mortar/adhesive for each individual piece. Should a thin film (skin) appear on the surface of the adhesive, re-agitate with trowel before bedded.
- Press the dry Natural stone cladding firmly into wet mortar with a twisting action. Product must be bedded with the aid of a Rubber mallet.
- Lift and replace random cladding to ensure that 100% contact is being achieved between the cladding and mortar (no voids behind cladding).
- Back buttering of Natural stone cladding is recommended where the back of the cladding product surface is irregular or when cladding in awkward locations.
- Remove excess mortar from joints and cladding product before drying has occurred. The minimum joint width for Natural stone cladding is 2mm. Please take extra care when you butt joint the cladding.
- If and when required the cladding can now be grouted – using a mortar mix (1 parts sand to 1 part PPC Cement, preferably with a cement modifier chemical to get non-shrink properties). Seal the joints with the use of a pointing tool depending on the desired finish.
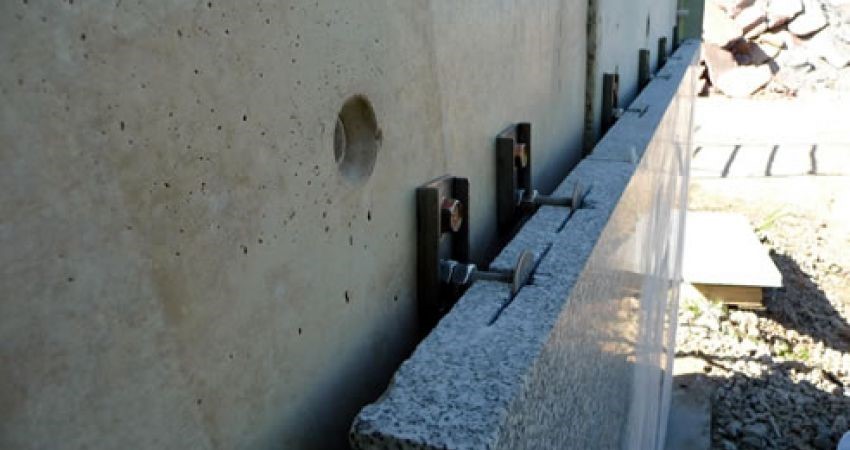
Dry Installation Method of Natural Stone Cladding
Dry installation method which is also known as mechanical installation method uses embedded metal anchors and ties for the connection purpose. The stone required for this method must be thick because the method requires drilling which could increase the occurrence of cracks.
Advantages of Dry Installation Method
- The dry cladding method is safe and it prevails the stone from falling off for years.
- This method allow for expansion and contraction of stone in extreme weather conditions.
- The dry cladding method creates a cleft of around 30 to 45 mm (1”-1.5”) in between face of the wall and stone covering, providing a layer of air cushion that acts as a thermal barrier.
- The appearance of stone used in dry cladding work looks spotless and aesthetically pleasing.
- It is a time saving procedure.
Disadvantages of Dry Installation Method
- There are chances for the occurrence of cracks on substrate.
- It is an expensive method.
- Requires perfection and alertness because of the following
- If the holes are not drilled properly then it could waste material.
- While drilling one must be alert otherwise it could be harmful for you.
- It requires high skilled labour.
Here is the step-by-step procedure for the dry installation method of natural stone cladding:
Step-by-Step Installation Procedure for Dry Installation Method
Step-1: Selection of Materials
- The brackets must be made of stainless steel. The dimensions of the brackets and their pin depends on its type as listed below-
| Sr. no | Type of bracket | Width (mm) |
Thickness (mm) |
Pin diameter (mm) |
| 1. | Z- bracket | 35-60 | 3-5 | 4-6 |
| 2. | L- bracket | 30-50 | 3-4 | 2×4 |
| 3. | Omega bracket | 30-60 | 3-5 | 4-6 |
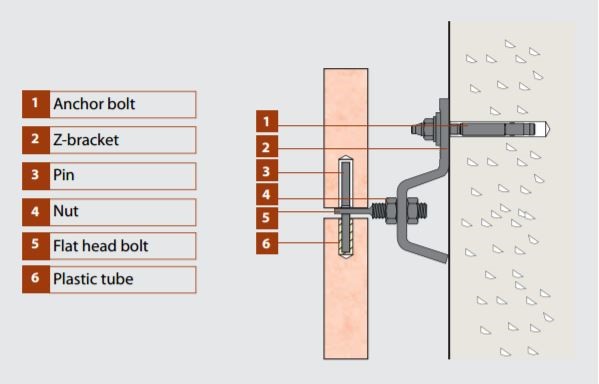
Z – Bracket
Step-2: Site Preparation
- Clean all the dirt from the surface of the wall.
- If the wall is constructed freshly make sure it is properly dried up and the surface is not friable so that the pin could be firmly fixed in the hole drilled.
Step-3: Installation Method
- Accurately locate the position of the hole
- You can start either from the left or the right corner of the wall leaving a minimum gap of 2mm (0.07”)
- Drill a hole of appropriate depth and thickness according to the size of pin. Standard dimension of hole can be 80mm – 100mm (3” – 4”)
- Insert the expansion bolt into the hole.
- Insert the pin in the angle to match the hole in the cladding stone.
- Place the first natural stone and tighten the bolts and pin properly.
- Leave a clear space of at least 2mm between every 2 natural stone.
- Similarly clad the entire wall.